Most of the users out there have come across the word RAID but most of the time we do not know what RAID means and what it is.
Well RAID is the process by which you can use multiple discs as one storage hard disks. This process makes it easier for you to use your spare disks as one massive hard drive or you can use it as disks for making backups.
In this article we will present you with a guide that will enable you to create RAID array. For the sake of this article as an example we will use three hard disks of 2 GB each to create one 6 GB disk using the Windows 7 professional edition.

Setting Up The Disks
- Backup the information that is present on the hard drives that your intending to use in the RAID.
- After you have completed the backup of the data open your start menu and right click on the computer
- When the options open then click on manage and then click on disk management options that you can find on the left side.
- The disks that you want to use in the RAID array you need to delete them for the top area of the disk management. Right click on the disk you want to delete and then click on delete volume.
- Once you have removed the disk that you intend to use in the RAID array you will be left with the disks that you don’t want to use as RAID
Instruction On How To Create The RAID
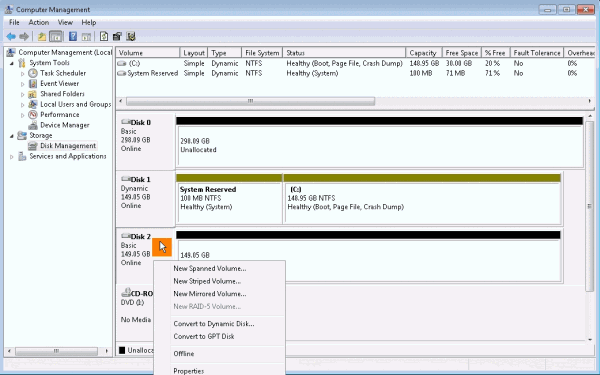
- In the disk management window if you look below you can see the space that are unallocated so right click on the disk you want to use as RAID and click on new spanned volume.
- Doing this will open the new spanned volume wizard. click on next to select the disk that you want included in the new volume
- Assign a drive letter to the new volume and click next and then select format in NTFS system.
- Check mark the box perform a quick format and then click on next
- Once you click on finish you will be presented with a warning message showing whether the operating system is on the volume or not
- Once your disks have been formatted it will be mounted and you will be presented with an auto play prompt.
- Once you open the my computer window you will be presented with a new drive which you have named and assigned a letter with the combined storage of the disks that you have put in to the RAID array.
- Congratulations you have created a new volume which is comprised of the three hard disks in the RAID configuration
We hope this article has been help to you in creating a Software RAID ARRAY which will help you to manage space and also put the spare hard disks to use.

Speak Your Mind