You must be having loads of old photographs in your photo album or some box that you have kept carefully since they contain your precious memory. But old photographs do get damaged over time.
With accumulating dusts which leaves scratches and also the color fades away degrading the quality of the photo. So don’t worry you can fix the photos all by yourself and you don’t have to hire any professional to do it.
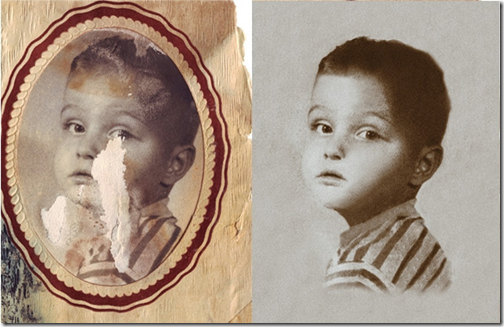
To help you in fixing those old photographs after scanning and also to make them even better we have written a guide for you that will help you in doing so.
Repair Scratches In Photoshop
- Open Adobe Photoshop and load the image you want to repair
- Now you look to your left and select the paint brush tool and highlight the area which look damaged to you and paint it the color of the surrounding area
- It would be better if you zoomed in to the picture that way you can notice more areas that are damaged and select them and color them with surrounding area color.
- Do this for all the area of the photograph making sure to zoom in and keep on filling the color defects
- Also you can adjust the color settings so open the histogram and keep an eye on the image and also the histogram as you adjust the color and saturation settings until you get the right choice with which you are comfortable
Tools That You Can Use For Repairing Photos
1. Clone Stamp Tool:
This is one of the commonly used tools for repairing photos. It will sample or copy from one area and allow you to paste that on to another area of the photograph. You can use the clone stamp tool in GIMP and Paint.Net also with the following shortcuts:
- Photoshop shortcut letter “S” and take sample with Alt + Click
- GIMP shortcut key is “C” and take sample with Ctrl + Click
- Paint shortcut key is “L” and take sample with Ctrl + Click
2. Marquee, Lasso Selection Tools:
This tool will allow you to pick up pieces of your photo and cover up the blemishes on your photo by pasting over the damaged areas. It is useful in places where you want to cover large damaged areas or unwanted objects. Use the following shortcut to use it:
- Photoshop key is “M” for Marquee and “L” for Lasso
- GIMP key is “R” for Marquee and “F” for Lasso
- Paint.Net key are “S” and you will be able to toggle between Marquee and Lasso.
3. Healing Brush and Spot Healing Brush:
This is a very helpful tool it will sample from an existing part of your image and tie up your brush stroke to the appearance of the surrounding area as a result the brush strokes appear invisible. To use this tool:
- Photoshop key is “J” for healing brush and sample with Alt + Click
- GIMP key is “H” for healing tool and sample with Ctrl + Click
We hope the guide has been helpful to you and also the tools that we mentioned has helped you in making your photos more beautiful and nice. Do let us know if you come across some other tools that would help to enhance the damaged photos.
Ngoja nijaribu kutumia Adobe Photoshop kwa kufuata maelekezo yenu hapo juu.
Hi Amina,
Give it a try and let us know your thoughts!